Categories
docs

Color size setting

Color size setting

Set the color size in the Product Details tab.
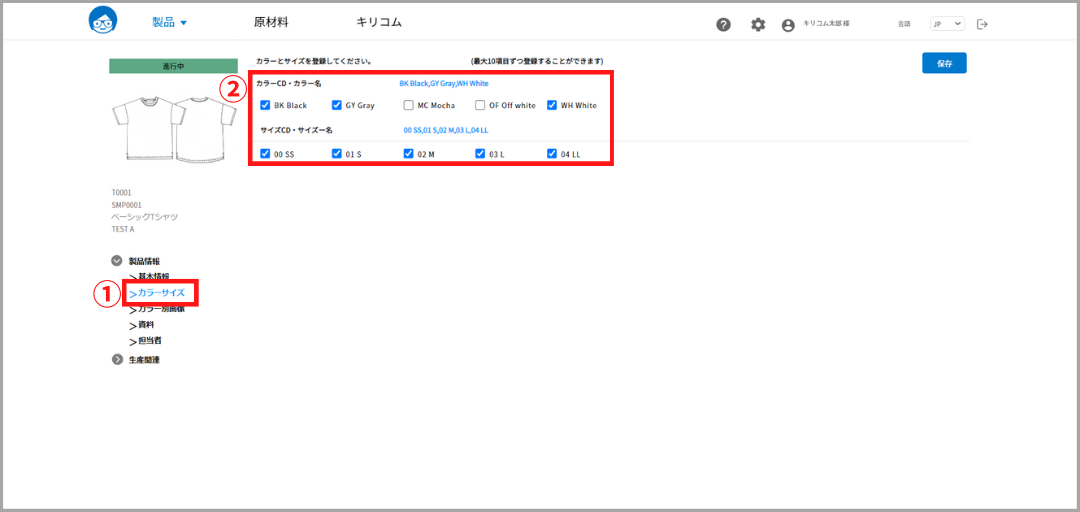
①Open the “Color Size” tab from the tab list in the lower left corner of the product detail screen.

②Select the color and size. Once selected, the checkboxes will be checked and listed in blue text.

Register the color as a master

Register colors on the master screen.
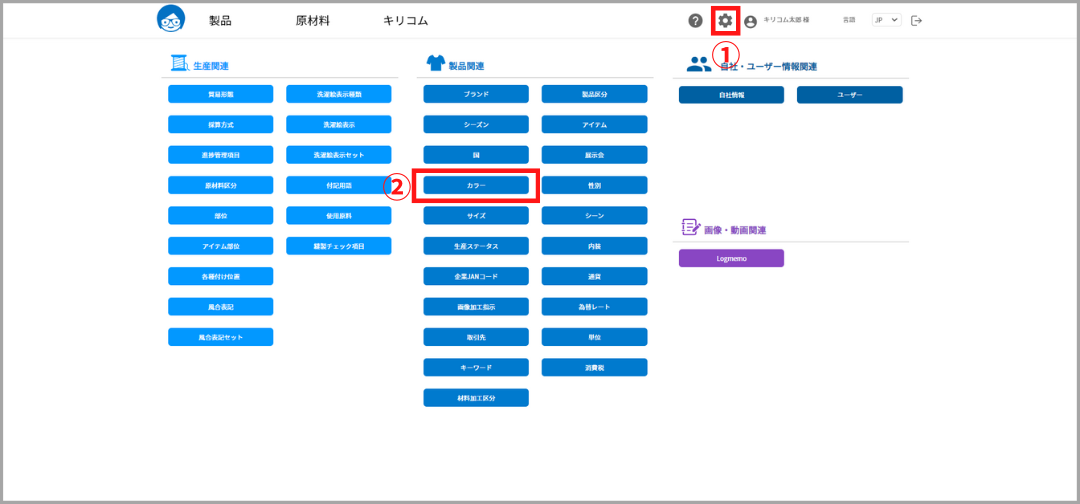
①Click the gear icon in the header at the top of each page to open the Master List screen.

②[Product Related]Click on “Color” from the “Color Master” menu to open the color master.
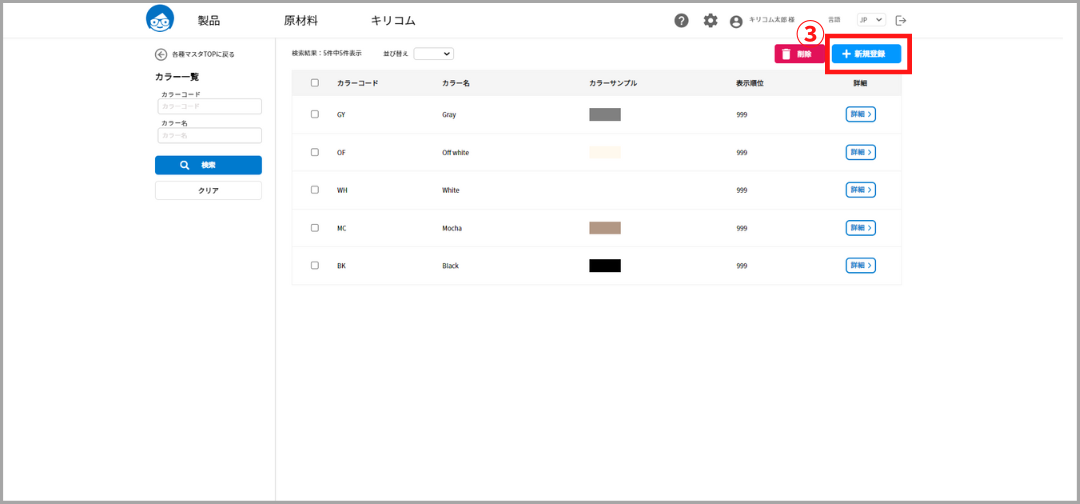
③Press the New Registration button to register a color.
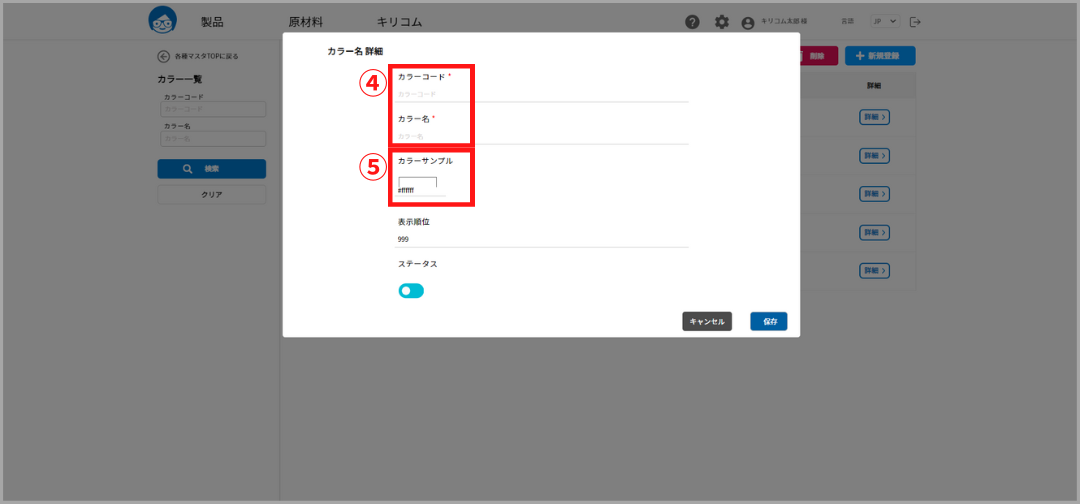
④The color code and color name are required fields.

⑤Click to set the color sample.

Master size registration

Register the size on the master screen.

①Click on the gear icon in the header displayed at the top of each paper page to open the Master List screen.

②[Product Related]Open the color master by clicking on “Size” from the

③Press the New Registration button to register the size.
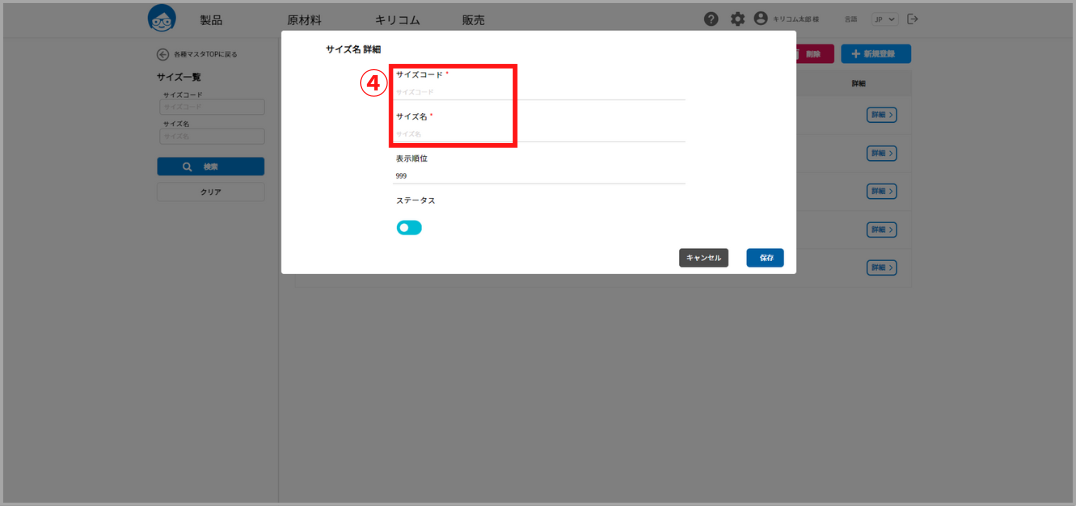
④Size code and size name are required fields.

Categories
KIRIKOM PLUS

Support function for “Sasage Business”: Let’s register to the texture chart with Kiricom Plus and get HTML data!

Kilicom Plus has released a new function for creating EC information. Continuing from yesterday, today we will introduce the “texture chart registration function. Looking at e-commerce sites these days, we see an increasing number of charts describing the fabrics used in products. Spurred by the Corona disaster, and now that shopping online is commonplace, it is essential to display the information in a way that is easy for customers to understand. Certainly, it is easier to understand at a glance than a written explanation, as was the case a decade ago. This work is the “manuscript” portion of the whispering business, and a chart display would be useful to create a more sophisticated manuscript than other companies. …but it is quite time-consuming to create that chart every time. So! The “Texture Chart Registration Function” released by Kilicom Plus is very useful. In order to tell customers about the texture of the materials used in your products, you can register a variety of items. How thick the fabric is, whether it is stretchable or not, whether it is transparent or not, whether it is shiny or not, and so on…all of these are things that cannot be seen from the screen. By registering them and making them selectable, the efficiency of registration work in daily EC operations can be improved. The texture chart is also available as HTML data for use on web pages. Now, there are four steps to operate such a texture chart. ①  Register textures and their evaluation values on the master screen. (e.g., fabric thickness: thick, normal, thin) ②  ①Registers a set of textures registered in ((e.g., blouse, fabric thickness, transparency, elasticity, etc.) ③  EC Information > Texture Description is displayed from the product details. ②Select from the set set in ④Set and save chart contents. This completes the process. Again, a short video of the operation is available. Please take a look and experience Kilicom Plus! Kiricom Plusis a free cloud service that allows you to centralize your image and product management. Please register for free and feel the operation. In Kilicom Plus,New introduction consultationBeginning with the “Mere Old Man”,Online ConsultationWe also accept Please feel free to contact us.
Categories
KIRIKOM PLUS News Press Release

InfoEye, a company promoting apparel DX, and its “Kiricom Plus” solution for the fashion industry are certified as IT tools eligible for the “IT Introduction Subsidy 2022”.

IT Introduction Subsidy 2022 A subsidy of up to 1.5 million yen is available!

(headquartered in Chiyoda-ku, Tokyo; Takayuki Kodoi, President; hereinafter referred to as “INFOI”), which promotes DX in the apparel industry, has been selected as an IT introduction support provider for the “IT introduction subsidy 2022 (IT introduction support business for improving service productivity),” and its “Kilicom Plus” solution for the fashion industry developed and provided by the company has been certified as an eligible IT tool for the subsidy, following “APASYS.
As a result, apparel companies eligible for IT introduction subsidy 2022 can receive a subsidy of up to 1/2 of the introduction cost (initial cost and one-year usage fee) or a maximum of 1.5 million yen when they introduce “Kilicom Plus”.
APASYS can utilize up to 4.5 million yen in IT introduction subsidy 2022

キリコムプラス

What is Kilicom Plus?
Kilikom Plus is a cloud solution for the fashion industry that you can start for free.
Starting with product planning management, daily image management, product management, and creation of sewing specifications are also possible.
Registered planning information can be easily output as line sheets or sales materials in PDF format, and registered product information can be posted to web exhibitions at the touch of a button.
Based on the advice of our customers, we have also implemented functions such as size charts, texture charts, and automatic AI product description creation, all of which are necessary for EC operations.
We are currently expanding these functions, reflecting customer feedback and the experience of those who have worked in the apparel OEM and SPA industries over the years.
Kilicom Plus will continue to pursue efficiency and strongly promote apparel DX for our customers.

▼ Click here for more information on the target tools.
https://plus.kirikom.net/


About IT Deployment Subsidy 2022
The purpose of the IT introduction subsidy is to support small and medium-sized enterprises (SMEs) to improve business efficiency and increase sales by subsidizing a portion of the cost of introducing IT tools to solve their own issues and needs.


About InfoEye
Since our establishment in 2002, we have been providing solutions and operations for the apparel industry and image cropping services based in Japan and India.
In the future, we will continue to expand our business to the fashion industry and provide useful solutions to our customers.


【About Us】

Company Name: InfoEye, Inc.
Location: 503 BIZSMART Kanda, 1-10-6 Kajicho, Chiyoda-ku, Tokyo
Representative: Takayuki Kodoi
Established: February 2002
URL: https://infoeye.com/en

Qualifications and Certifications

Business Description:
Construction and operation of solutions for the fashion industry
Image cropping and processing service (Kiricom)

Categories
KIRIKOM PLUS

Support function for “Sage Business”: Register for size chart with Kiricom Plus and get HTML data!

Kirikom Plus has released a new EC information creation function! Today, we would like to introduce the size chart registration function, which is indispensable for EC operations. Simply put, it is a function that allows you to register the size chart of a product for each item number. Furthermore, the registered size charts can be saved as HTML data. If you are in the EC business, you must have heard the term “Sage Business”.。 Photography Measurements. Manuscripts. These acronyms are called “Sage Operations. In order to upload the product images to the company’s e-commerce site, we photograph the product from various angles, create a product description that is easy for the customer to understand, and then take measurements and put them together into size descriptions. These are very important to convey the company’s products to customers in an attractive and correct manner, and are important tasks that directly lead to sales. On the other hand, the hassle of people and equipment, and the cost, time, and skills required for efficient business progress, may be a headache for many. By using the size chart function of Kilicom Plus, which is introduced in this article, you can easily find the size of your whispering business.Measurements. It is possible to improve efficiency in some areas. You can also use the HTML data I mentioned at the beginning of this article to display on a web page. There are three major operating procedures.  (1) From the master screen, set what item part is displayed at what type of time for which item. (e.g., when setting the maxi length of a dress, the length, bust, hem width, shoulder width, and sleeve length are displayed.) ②  EC information from product details > Dimension table is displayed.①Select the settings made in ③  Enter dimensions for each size and save. This completes the process! Again, a short video of the operation is available. Please take a look and experience Kilicom Plus! Kiricom Plusis taking a variety of steps every day to lighten the burden of EC operations. Manuscripts.”For increased efficiency in creation,AI automatic product description creationfeatures are available. Please see our June 11 blog for more information. Our service, Kiricom, also offers a variety of image and photo processing and retouching services. Shooting.”If you have any problems with the images that you have made, please contact Kirikom.
Kirikom Plus is a free cloud service that allows you to centralize your image and product management. Please register for free and feel the operation. In Kilicom Plus,New introduction consultationBeginning with the “Mere Old Man”,Online ConsultationWe also accept Please feel free to contact us.
Categories
docs

Enter specifications

Enter specifications

This section describes the entry of specifications.

Select the specification to be created from the list of specifications on the left side of the screen and enter the specifications.

Be sure to enter a title for each specification when saving.

The fields with gray background color are automatically populated with the information registered in the product details.
They cannot be edited on the specification sheet screen. These information can be registered and edited from the product details screen.

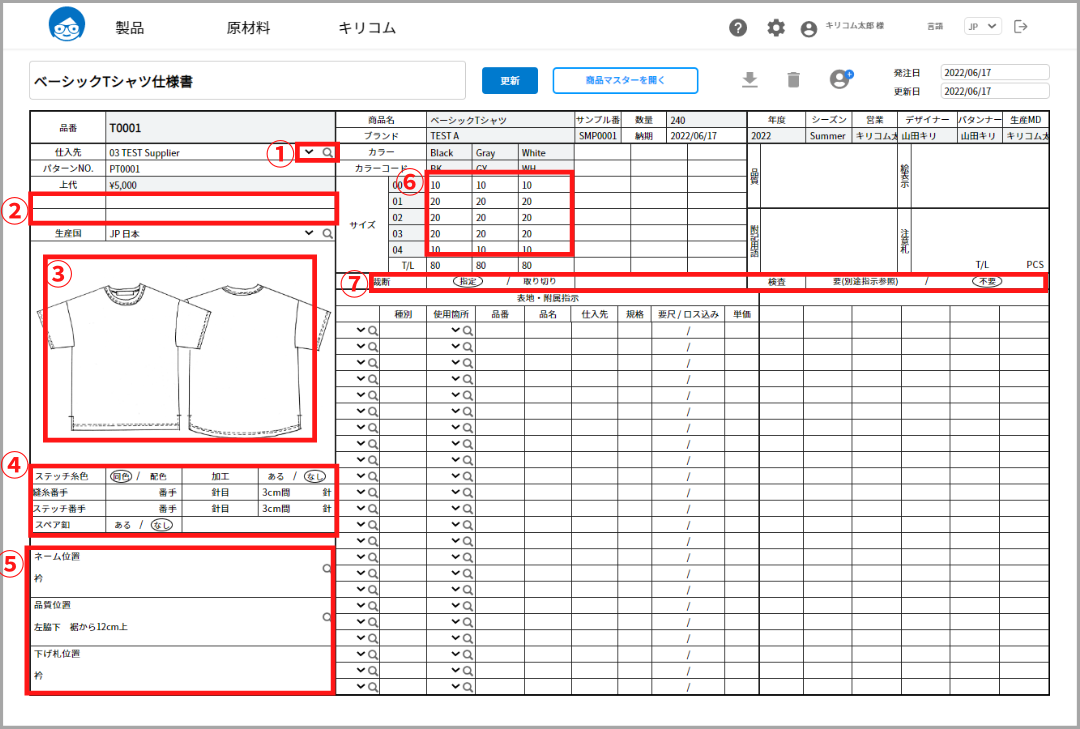
specification document

A specification sheet that provides basic information about the product.

①The columns with downward pointing arrows display a drop-down list for selective entry. Clicking on the magnifying glass icon will allow you to search for and select information registered in the master.

②Blank spaces without titles are free-form fields. You can manually enter the number of parts, pattern matching, and other necessary information.
③You can register one image. Click the + mark in the center and select the image you wish to register. You can also register an image by dragging & dropping it.
④You can enter information about the yarn used, processing, etc. Clicking on one of the stitching thread color, processing, or spare button columns will place a circle around the button.

⑤Manual entry can be made for each position. For name and quality positions, click the magnifying glass icon to search and select information registered in the master.

⑥The quantity of each color and size can be entered. The total quantity is automatically calculated and the quantity is entered. Color and size settings are made on the Color Size tab of the Product Details screen. For details, seethis way (direction close to the speaker or towards the speaker)for more information.

⑦You can select the type of cutting and whether or not an inspection is required. Clicking on one of the two will circle the other.

Dimensions

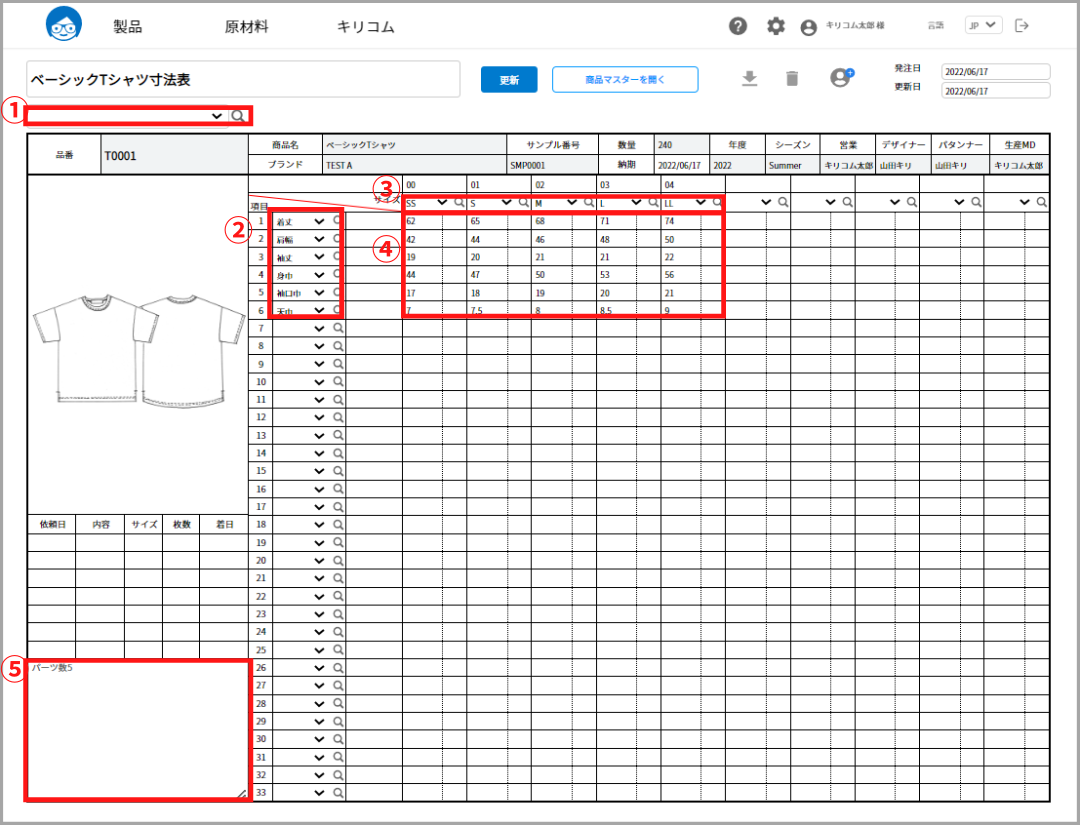
This is a dimension table that describes the dimensions of each part.

①You can search for a set of parts for each item registered in the item part master by using the drop-down list or the magnifying glass button to input selections.

②Select each part. The information registered in the part master will appear in a drop-down list. You can also click the magnifying glass icon to search and selectively enter information.

②Select a size. Information registered in the size master will appear in the drop-down list. You can also click the magnifying glass icon to search and enter your selection.

③Manually enter each size dimension for each part.

④Remarks. Customers can manually enter the required information.

Sewing Specifications

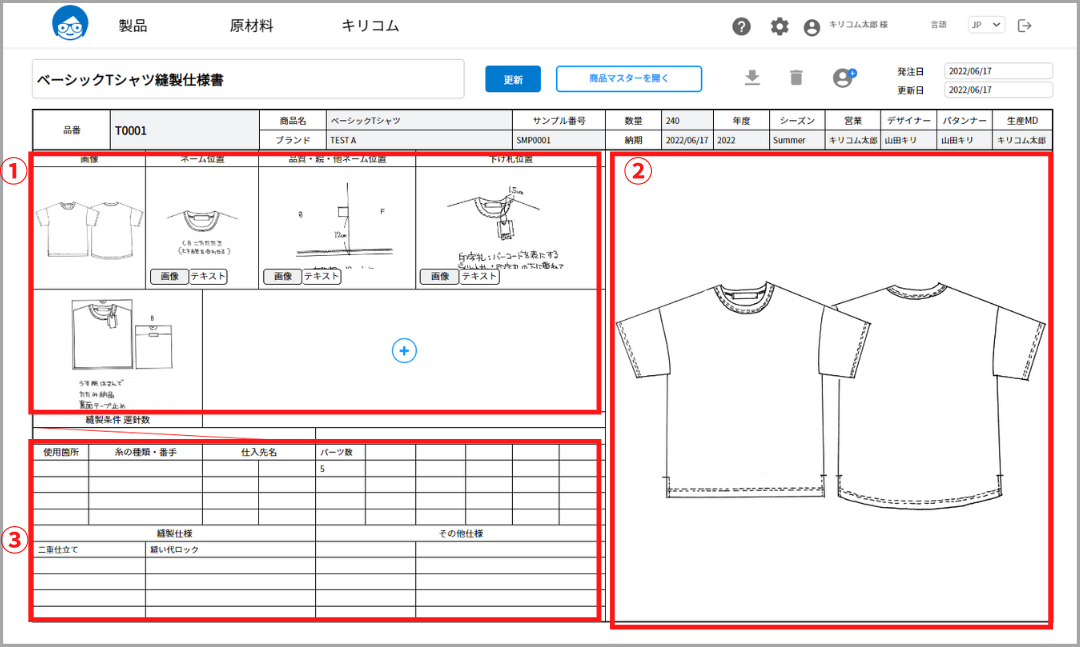
Sewing specifications that describe the various attachment positions and sewing specifications.

①You can register images of the various positions. For columns with text buttons, you can choose to enter either images or text.

②Images can be registered.

③Manual input can be made for various specifications.

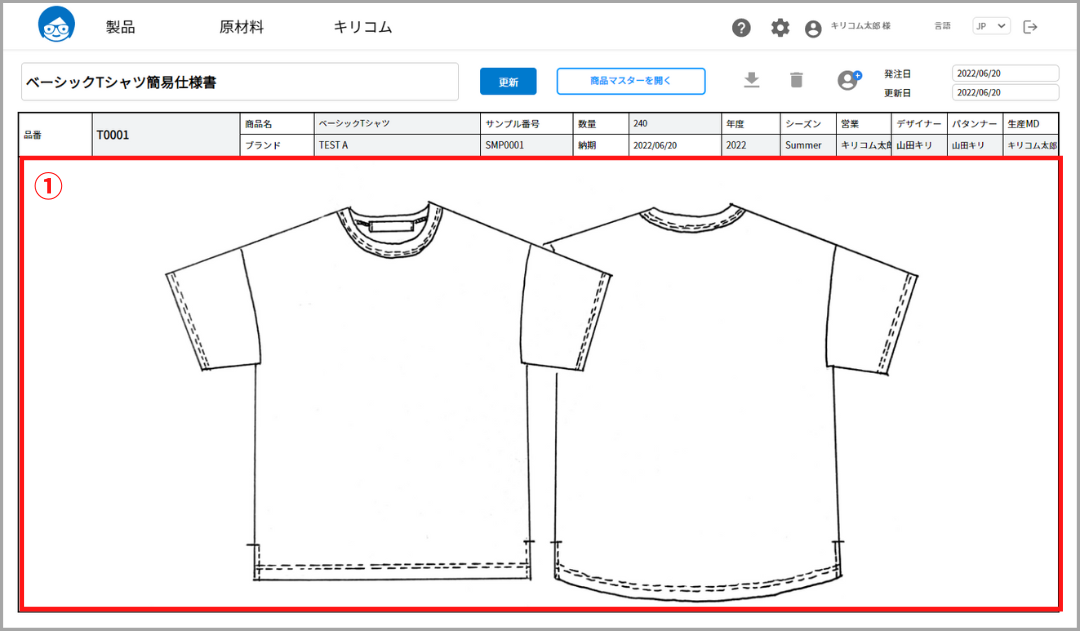
simplified specification

This is a simple specification sheet with basic product information transcribed in the upper column. Analog specification sheets can also be registered as an image by taking a photo.

①You can register one image. Press the + button in the center to select an image. You can also register by drag & drop.

Categories
FileMaker News

Automatic translation of sewing specification documents

DeepL

When dealing with overseas manufacturers, there are often times when we have to translate comments into their language.
This applies to sewing instructions as well, but I think the most common case is when inspecting the samples that have come in.

When translating, of course, you may be using your own abilities, or you may be looking at the old yellow apparel dictionary.
More recently, we have seen an increase in the use of excellent translation sites such as Google Translate and DeepL.

In this article, we will show you how to use the API of DeepL and incorporate it into Claris FileMaker Custom Apps that you have created yourself.
We recommend you to use the paid version of the software for full-scale use, but for the time being, you can use the software for free.
There are many sewing-related terms that are unique and technical terms that are generally difficult to translate, but you can use the glossary at DeepL to grow your level of translation.
Here are the steps

1. Go to the DeepL site and register for free membership.
DeepL

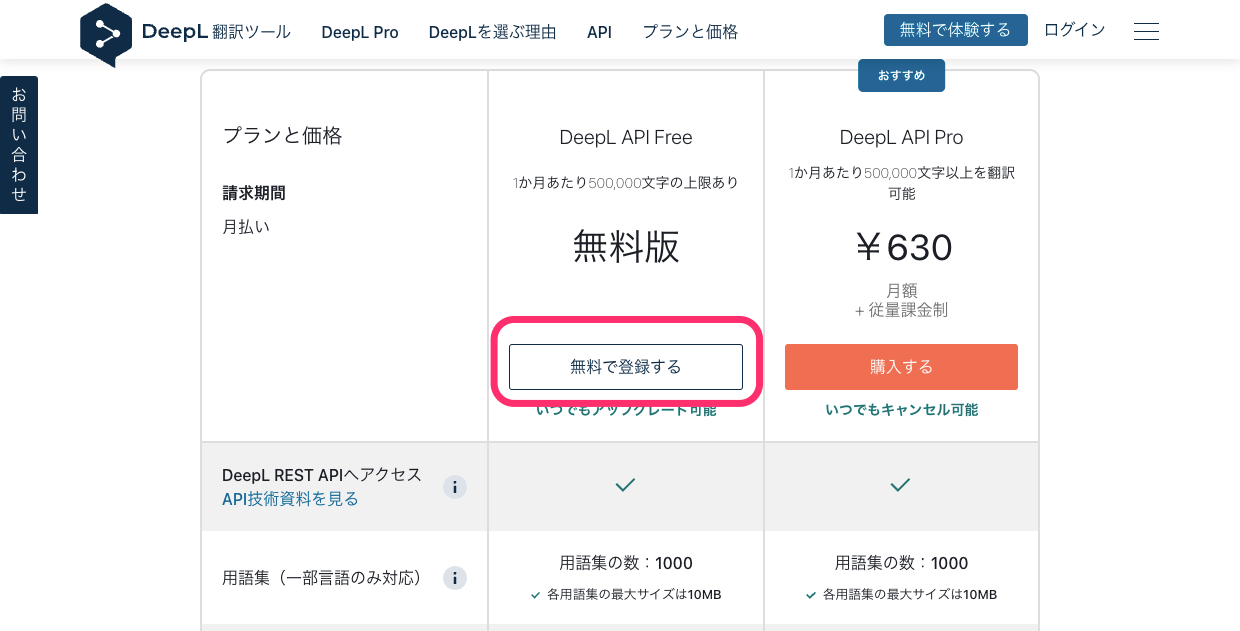
2. Go to the middle of the screen and press “Register for free” to register.
DeepL

3. After registering, go to DeepL developer site and go to “Account” in the upper right corner.
https://www.deepl.com/ja/docs-api/
DeepL

4. Copy the “DeepL authentication key used for API” in the “Account” tab, as it is required for this API use.
DeepL

5. From here, we will create Claris FileMaker Custom Apps.
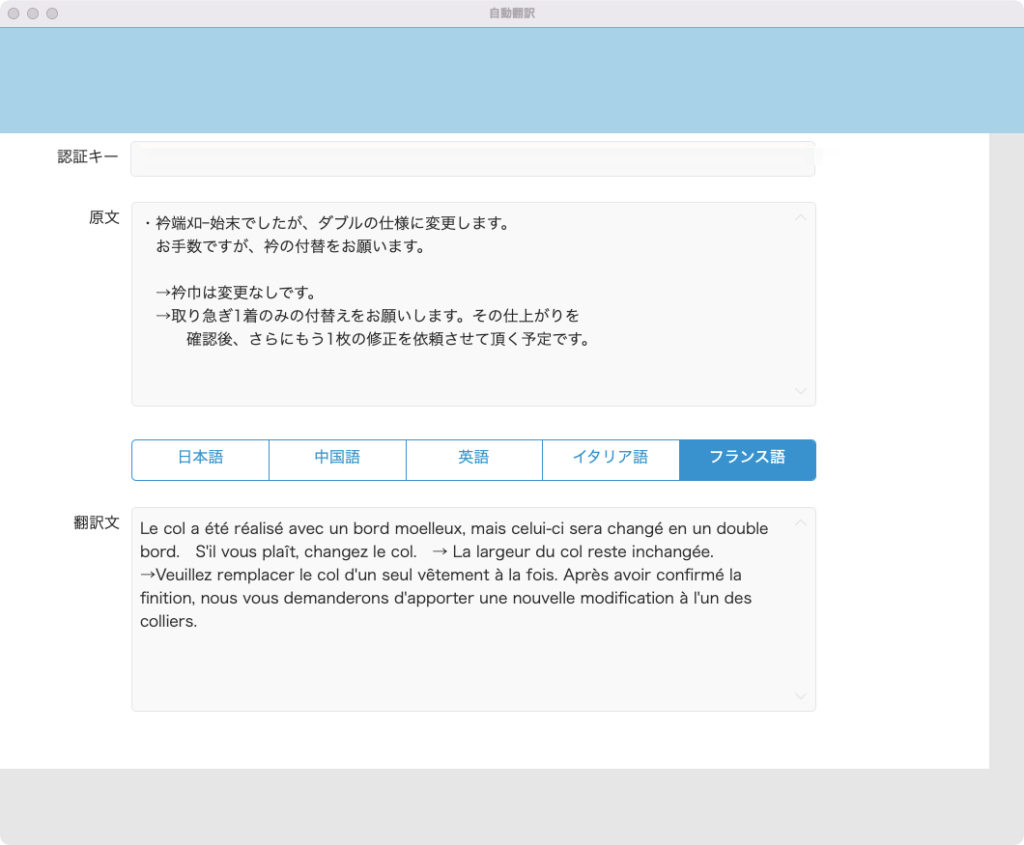
Below is the completed diagram.
DeepL

The main flow is that you enter the source text, select the language with the button, and the source text and the language you want to translate are sent to DeepL.
The excellent DeepL automatically detects the received language, converts the source text into the language you want to translate, and returns the translated text.
At this time, you will need the “authentication key used by DeepL API” that you have just obtained.

6. We will follow along with this sample file. Although global fields are used, they do not have to be global fields.

Field Name         type                          Options/Comments
g_text 1                 Text Global                          Enter the original text
g_text 2                 Text Global                          Translated text retrieved from DeepL will be entered
g_lang                  Text Global                              Set the language to be translated
g_authentication_key          Text Global                         Authentication key for DeepL

7. We will create a script.
The script is only 3 lines long.
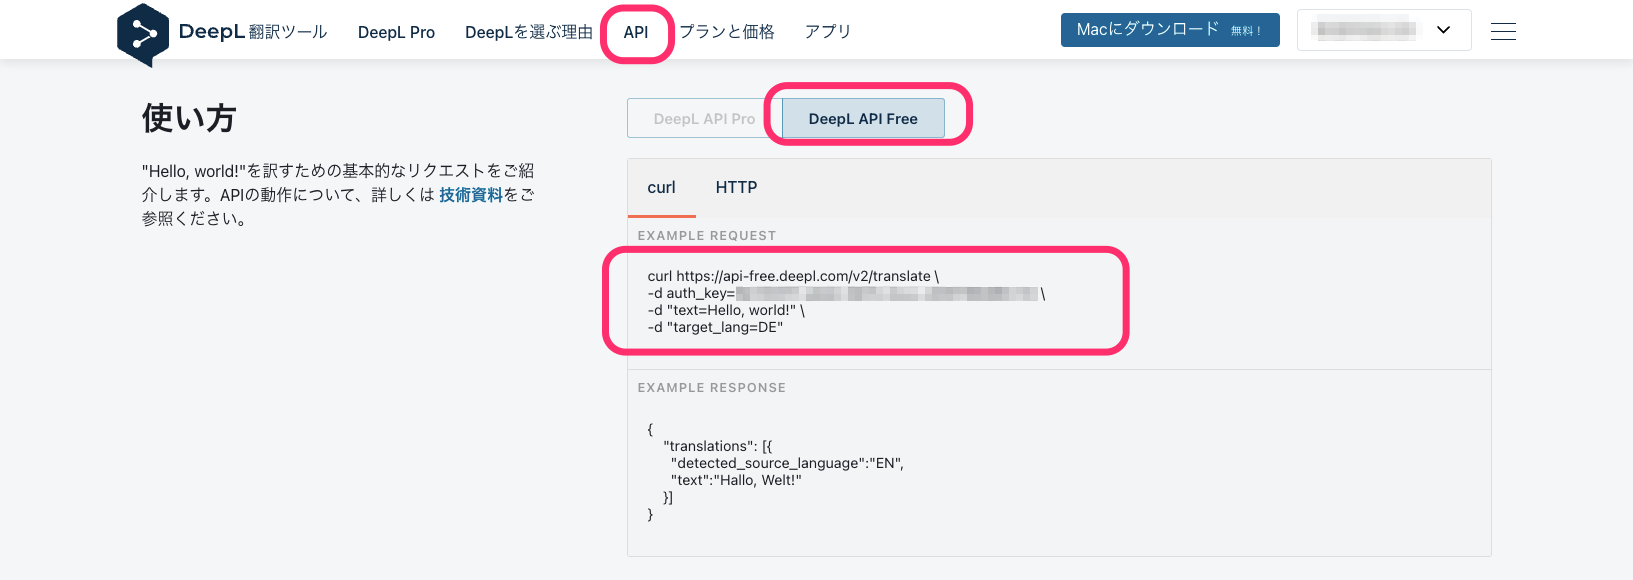
Moreover, I see that the DeepL site describes what to set up, including the authentication key.
Basically, we will use this as is.
DeepL

7. We will create the actual script.
Let’s review what you have just copied from the DeepL website.
Replace “Authentication Key” below with your own authentication key.
curl https://api-free.deepl.com/v2/translate \
-d auth_key=authentication key \
-d "text=Hello, world!" \
-d "target_lang=DE"

The following is a breakdown of the file that is easy to grasp in Claris FileMaker.
destination URL: https://api-free.deepl.com/v2/translate \
Authentication key: Your own authentication key
Original: Hello, world!
Language to be translated: DE

Set a 2-letter code for the language to be translated.
EN if you want to translate it into English.
See “target_lang” on the following page for a list.
https://www.deepl.com/ja/docs-api/translating-text/request/

The following is the script
In actual Custom Apps, there is no need to use global fields.
Also, you do not need to use the button to translate, you can master the languages to be translated for each client in advance and automatically execute the translation script by using the script trigger “OnObjectSave” in the “Source” field.
Furthermore, since there is a slight time lag in translation, it would be a good idea to run the translation on the server side and have the translated text in the background to eliminate frustration during busy times.
1: Field Settings [ Auto Translate::g_lang ; Get ( script argument )
2: Insert from URL [ Select ; Dialog: off ; Target: $r ; "https://api-free.deepl.com/v2/translate" ; cURL option: " -d auth_key=" & auto-translation::g_authentication_key & " -d \"text=" & auto-translation::g_text 1 &"\" & " -d \"target_lang=" & auto-translation::g_lang &"\"]
3: Field Settings [ automatic, machine translation::g_text 2 ; JSONGetElement ( $r ; "translations[].text" ) ]

○ treatment
Enter the authentication key and the original text, and press the language button to display the translated text.

Categories
KIRIKOM PLUS News

Shorten time using AI: Automatic acquisition of keywords from images, automatic creation of product descriptions from keywords

AI Automated Product Description Creation

Here is an introduction to the functions of Kilicom Plus.
The tool acquires keywords from product images using AI, updates the keywords as necessary, and automatically creates product descriptions using AI.
This batch auto-retrieval tool is customized for each customer.

It is not a perfect product description, but we hope you will use it to reduce your daily workload of listing a large number of items.

Categories
KIRIKOM PLUS

Register your images by color with Kilikom Plus!

Kiricom Plusallows you to register images by color within the product information. The registration method is simple. Simply select from a folder or drag and drop. Up to 12 images can be stored per color.

Especially if you are managing an apparel e-commerce site, the number of images for each SKU will increase. Many companies may be managing the images for each person in charge. キBy managing all images at once in RICOM Plus, anyone in the company can check the images at any time, leading to the centralization of work.

There is also one nice feature here. This is the image cropping and processing service provided by InfoEye.    kiricomYou can also request image processing directly from Kirikom offers high quality and practically the lowest price image cropping service. For more information, please click the button below to visit our website as well.

Now, we have again created a short video showing the operation of image registration by color. Please take a look and experience Kilicom Plus for yourself. Kiricom Plus is a free cloud service that allows you to centralize image and product management. It is not only a production management tool, but also a centralized image management tool to promote DX for your company. Please register for free and feel the operation. In Kilikom Plus,New introduction consultationBeginning with the “Mere Old Man”,Online ConsultationWe also accept Please feel free to contact us.
Categories
News APASYS Press Release

InfoEye, a company promoting apparel DX, and its “APASYS” solution for the apparel industry are certified as IT tools eligible for the “IT Introduction Subsidy 2022”.

IT導入補助金

IT Introduction Subsidy 2022 Up to 4.5 million yen in subsidies are available!

(headquartered in Chiyoda-ku, Tokyo; Takayuki Kodoi, President; hereinafter referred to as “INFOI”), which promotes DX in the apparel industry, has been selected as an IT introduction support provider for the “IT introduction subsidy 2022 (IT introduction support business for improving service productivity)” and its apparel solution “APASYS” developed and provided by the company has been certified as an IT tool for the subsidy.
This means that apparel companies eligible for the IT Subsidy 2022 can receive a subsidy of up to 1/2 of the installation cost (initial cost and one-year usage fee) or a maximum of 4.5 million yen when they install APASYS.

APASYS

What is APASYS?
This solution for the apparel industry includes functions for planning management, merchandise management (products and raw materials), production management, purchase management, sales management, in-house exhibitions, store management, POS, logistics management, analysis, and accounting.
Of course, you can use only the functions you need.
We are currently expanding the functionality of the solution, reflecting customer feedback and the experience of those who have worked in the apparel OEM and SPA industries over the years.
We will continue to strongly promote Apparel DX.

▼ Click here for more information on the target tools.
https://apasys.net/

▼ Click here to learn more about case studies of the target tools.

APASYS case study by Claris FileMaker.

20 cardboard boxes of proposals in your iPhone
https://www.claris.com/ja/blog/2021/shirley-temple

Case Study of Centralization of Operations in Apparel OEM Industry – From Planning, Profitability, Exhibition to Production Management
https://youtu.be/b1mUdXF1b3w

Case study of centralized operations in the apparel industry – from planning and production to exhibitions and accounts receivable/payable management
https://youtu.be/cmExbYbSwbQ

APASYS

About IT Deployment Subsidy 2022
The purpose of the IT introduction subsidy is to support small and medium-sized enterprises (SMEs) to improve business efficiency and increase sales by subsidizing a portion of the cost of introducing IT tools to solve their own issues and needs.


About InfoEye
Since our establishment in 2002, we have been providing solutions and operations for the apparel industry and image cropping services based in Japan and India.
In the future, we will continue to expand our business to the fashion industry and provide useful solutions to our customers.

【About Us】

INFOEYE

Company name: InfoEye Inc.
Location: BIZSMART Kanda 503, 1-10-6 Kajicho, Chiyoda-ku, Tokyo
Representative: KOEDOI Takayuki
Established: February 2002
URL: https://infoeye.com/en/

Qualifications and Certifications

Business Description:
Building and operating solutions for the fashion industry
Image cropping and processing service (Kiricom)

Categories
APASYS KIRIKOM PLUS

Automatic database conversion of paper pictorial charts

OCR technology, which recognizes text from images, is now easily available to everyone.
I often used a translation application on my overseas business trips before the Corona disaster.
When you go to a restaurant in China or India, you can take a picture of the menu with an app on your smartphone and immediately translate it into Japanese or English.
In other words, the app recognizes and translates the characters from the image.

These days, the literacy rate of handwritten text is getting closer and closer to 100%.
We would like to introduce a function that allows designers to easily create a database of the pictorial types they have drawn.

Specifically, paper documents (picture type table) with part numbers and picture types are scanned into PDF or JPG format and read into the system.
The part number (text) field and the picture type (object) are divided and stored in the database.
It is also possible to store the customer’s sewing specifications, etc. in each item by recognizing the character position information in the same way.
(Settings for storing in each item are optional.)

This example will be a very simple example.